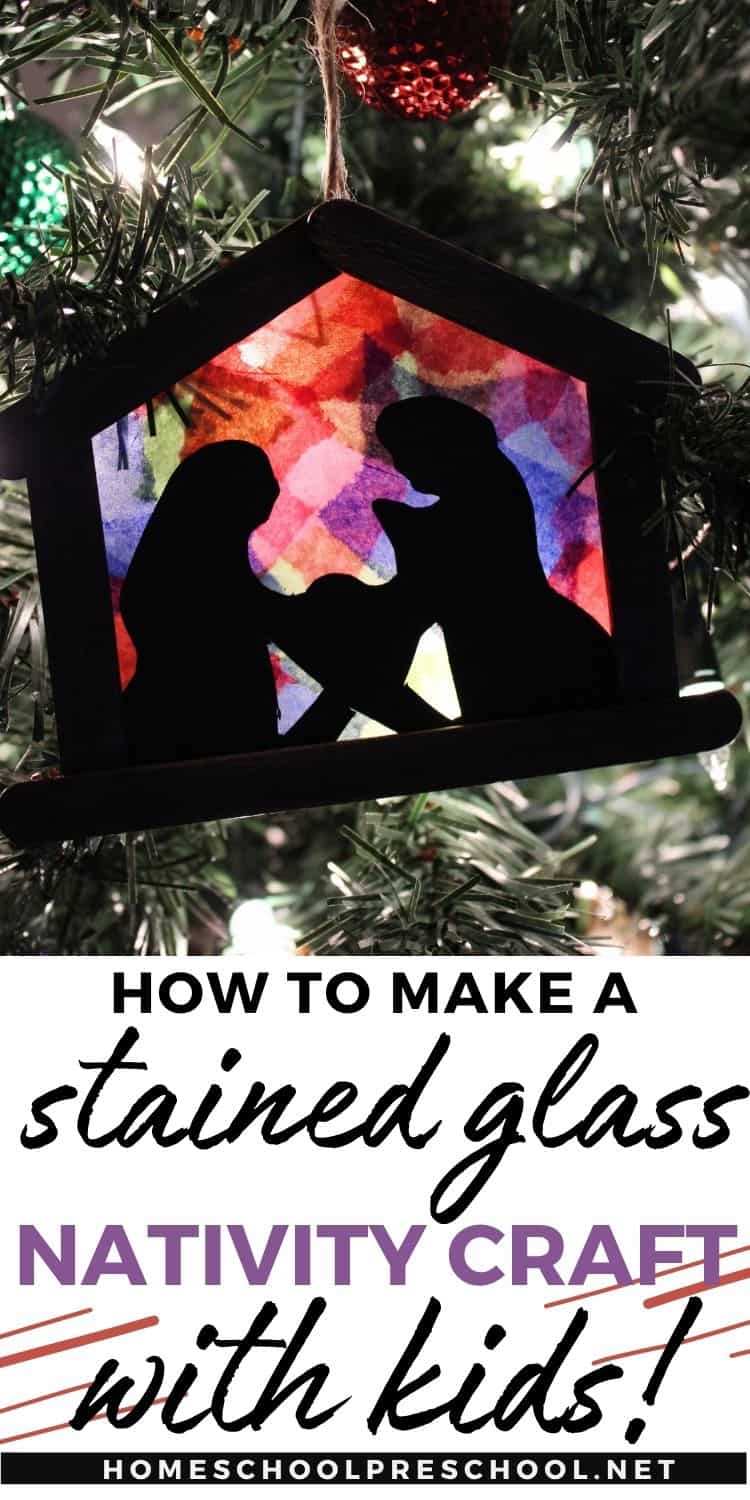
Simple Nativity Ornament Craft for Kids + Lesson Guide

Looking for a heartwarming holiday project that brings the Christmas story to life? A nativity ornament craft is the perfect way to engage little ones in the true meaning of the season.
Crafting ornaments that represent the nativity scene is not only a fun hands-on activity but also a wonderful opportunity to spark meaningful conversations about the story of Jesus’ birth.
Whether you’re decorating your classroom tree or adding a special touch to your home, this simple and creative craft is a lovely addition to your nativity activities for kids. Let’s dive in and create something memorable together!
Manger Ornament Craft Quick Facts
⏱️ Prep Time: 5 minutes
✂️ Active Time: 15-20 minutes
⏳ Total Time: 25 minutes (plus drying time)
???? Best For Ages: 3 – 6 years (Preschool/Kindergarten)
???? Key Supplies: Popsicle sticks, glue, contact paper, tissue paper
Why This Craft is Great:
• Simple: Uses basic supplies found at home.
• Skill Focus: Excellent practice for fine motor control and gluing.
• No Mess: The silhouette style minimizes mess compared to paint!
Teaching the Nativity Story Step-by-Step
A hands-on activity like this Nativity Ornament is one of the best ways for young children to connect with the true meaning of Christmas. While making the preschool craft, you are building more than just an ornament—you are building a tactile, visual reminder of the story.
Use the steps below to talk about the deeper symbols as you craft together, turning this simple activity into a powerful, memorable Bible lesson.
The Symbolism Behind the Craft: Three Talking Points
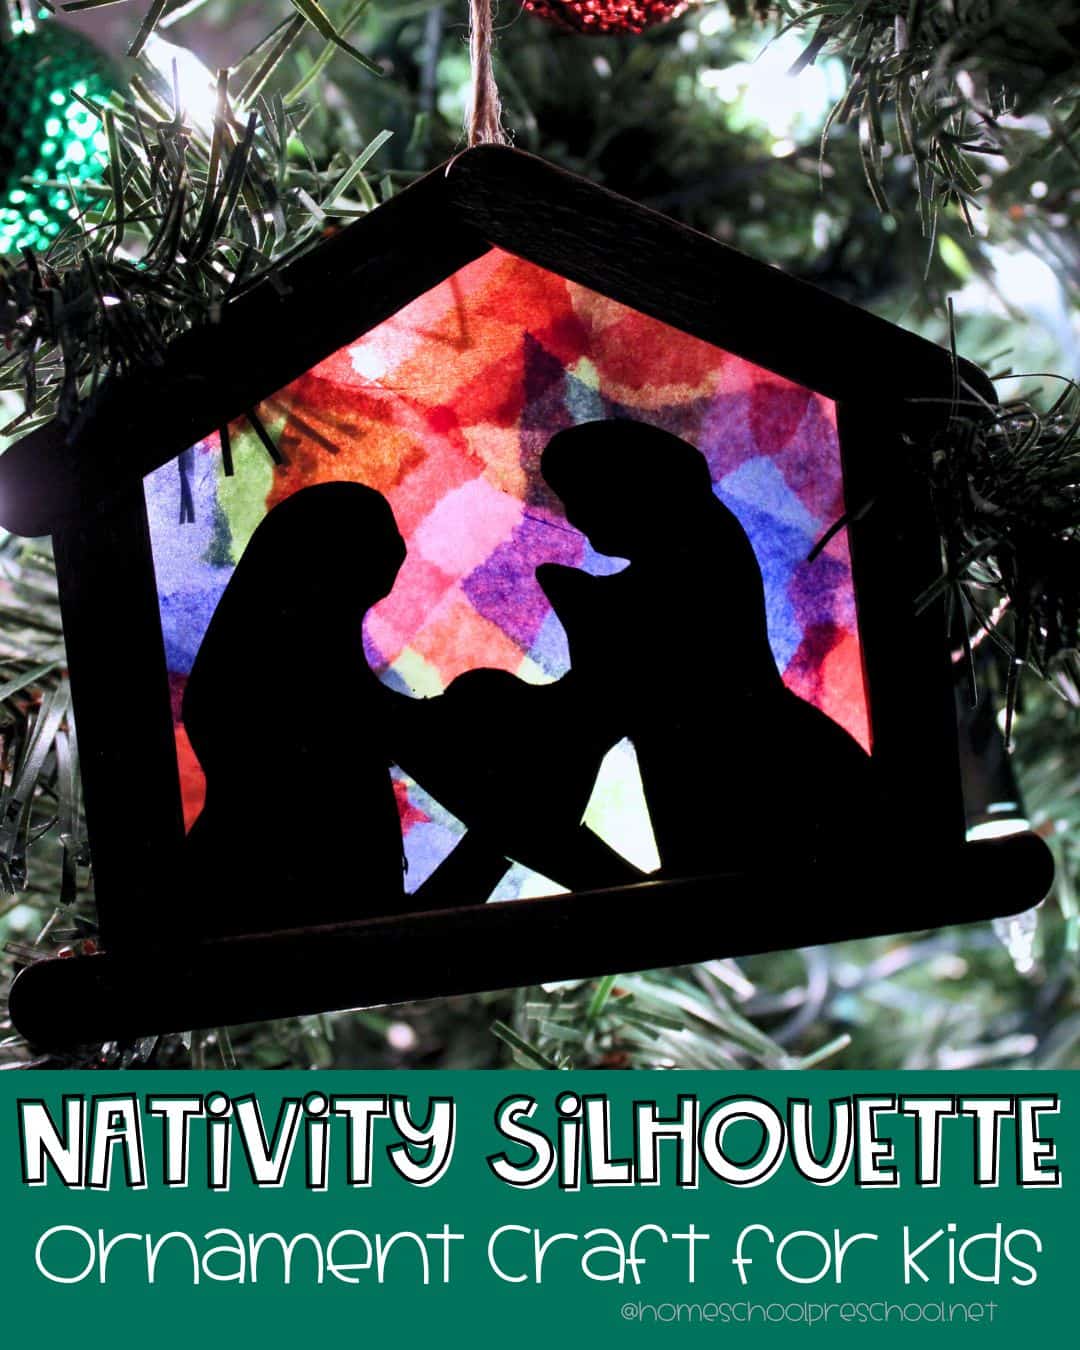
1. The Stable Frame (The Simple Shelter)
As you glue the popsicle sticks together, discuss why the Holy Family had to stay in a stable. Mary and Joseph found shelter in a very simple, humble place—a reminder that God’s greatest gift was not given in a palace but in the simplest surroundings. Use this moment to talk about making room in our hearts for Jesus.
2. The Silhouette (Focusing on Jesus)
The dark, solid silhouette we create focuses all the attention inward onto the Holy Family. This represents how Mary, Joseph, and the shepherds focused completely on baby Jesus, who was the reason for their hope. Every time your child looks at the ornament, the dark frame helps their eye focus on the light inside.
3. The Tissue Paper Light (The Star of Hope)
The colorful tissue paper acts as the light from the Star of Bethlehem, which guided the wise men to the stable. As your child carefully places the tissue paper pieces, explain that Jesus is the light of the world, shining hope and love into the darkness.

Key Scripture Connection
To ground your lesson in the Bible, read this simple passage together. You can keep it short and focused on the key moment:
“And she brought forth her firstborn Son, and wrapped Him in swaddling cloths, and laid Him in a manger, because there was no room for them in the inn.”
— Luke 2:7
By connecting the simple materials (the stable, the light) with the biblical story, this craft becomes a profound teaching moment, reinforcing the Christmas story in a way that preschoolers can easily understand and remember.
How to Make the Nativity Scene Children’s Craft
Nativity Ornament Craft
Equipment
- Scissors
- hole punch
- Paint brush
Materials
- Popsicle Sticks regular and mini
- Glue or Hot Glue
- Black Cardstock
- Contact Paper
- Tissue Paper
- Brown Paint
- Twine
Instructions
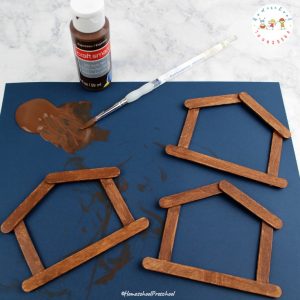
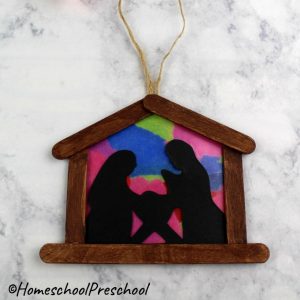
Glue the Stable Frame
- Glue three popsicle sticks together to form a simple frame. It should look like a box with no top. Overlap the sticks slightly at the corners.
- Glue two more popsicle sticks together to form a wide, upside-down "V". The bottom of the upside-down V should overlap the top of the frame to form a stable.

- Paint the stable brown if you'd like.
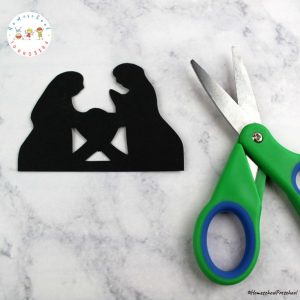
Create the Nativity Silhouette
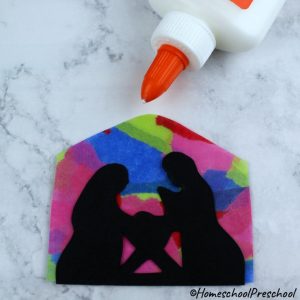
- [Adults] Use your printable template (or draw freehand) to trace the nativity silhouette onto the black cardstock.
- Carefully cut out the silhouette, ensuring the stable opening is larger than the inner frame of the popsicle stick square. The silhouette should completely block the inner square.
Prepare the Sticky Window
- [Adults] Cut a piece of clear contact paper that is slightly larger than your popsicle stick frame.
- Peel the backing off the contact paper and carefully lay it down on your work surface, sticky side facing up.
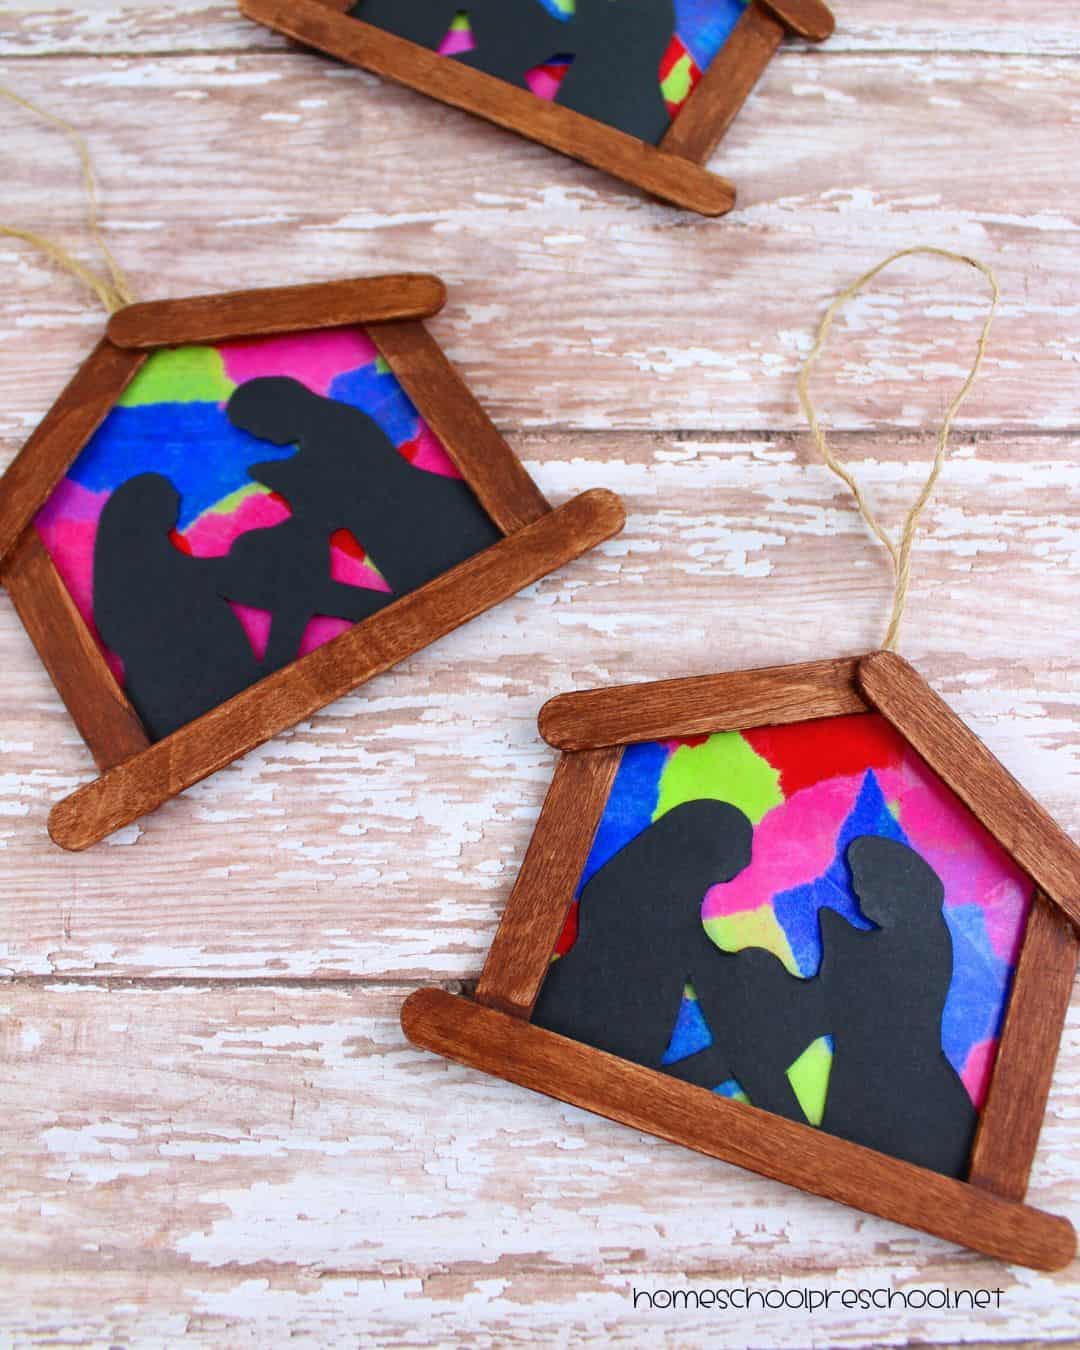
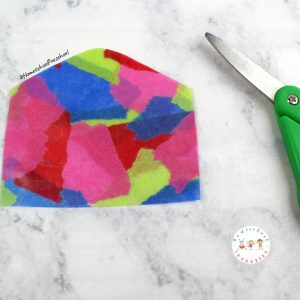
Create the Stained Glass
- Tear the colored tissue paper into small, varying-sized pieces. Use lighter colors, such as yellow, pink, and light blue.
- Have your child carefully press the torn pieces of tissue paper onto the exposed sticky area of the contact paper. Encourage them to overlap the pieces to cover the entire sticky square, creating a stained-glass effect.
- Glue the black silhouette piece in the center of the frame, pressing it firmly onto the tissue paper. This step seals the edges of the tissue paper, creating a clean, framed window look.
Frame and Seal the Window
- Glue the dry popsicle stick frame firmly onto the covered contact paper.
- Finally, glue a piece of twine or ribbon to the back of the ornament for a hanger.
Get Your Free Printable Nativity Craft Template!
Click here to download the printable PDF template!

Quick Answers: Troubleshooting & Craft Adaptations
It’s common for kids’ crafts to hit a small snag! Here are the answers to the most common questions about materials, glue, and making this craft suitable for different ages.
My popsicle stick frame keeps falling apart! What should I do?
This usually means you need more drying time or stronger support. If you are using traditional school glue (like Elmer’s), use clothespins or binder clips to secure the corners while they dry completely (we recommend drying the frame overnight). If you need a faster fix, an adult can use a tiny dab of hot glue on the corners for an instant bond.
I don’t have contact paper on hand. Is there an easy substitute?
Yes! If you don’t have clear contact paper, you can use wide, clear packing tape to create the sticky surface. Apply two overlapping strips of the packing tape to the back of the popsicle stick frame, sticky side up. You can then press the tissue paper onto the tape as usual.
How can I make this craft easier for a very young toddler (age 2-3)?
To simplify the craft for younger hands, we recommend making two modifications:
- Use Liquid Glue: Instead of the sticky contact paper method, let your toddler simply tear the tissue paper pieces and use a small amount of traditional school glue to stick them directly onto the inside of the frame. This skips the tricky contact paper step and focuses on fine motor skills.
- Pre-glue the Frame: Assemble and let the popsicle stick frame dry completely before presenting the craft to your child.

4 More Simple Nativity Ornaments to Try Today
- 3D Nativity Scene
- DIY yarn wrapped nativity ornament from Big Family Blessings
- DIY nativity advent countdown calendar from This Mama Loves
- Nativity star from Encouraging Moms at Home
- Nativity headband craft from Kids Craft Room
- Paper plate nativity craft from Easy Crafts for Kids
In conclusion, the holiday season presents a fantastic opportunity to inspire creativity while imparting valuable lessons about the nativity story.
Explore nativity crafts, captivating books, and interactive tools to help children grasp the true meaning of Christmas.
This holiday, let’s make memories, teach through play, and foster the Christmas spirit in our little ones.

Tara is the brains behind Homeschool Preschool, where her journey from preschool and public school teacher to homeschooling mom of three fuels her passion for early childhood education. With a blend of expertise and firsthand experience, Tara’s writings offer practical tips and engaging resources to support families in creating meaningful learning adventures at home.
![Easy Fathers Day Craft for Preschoolers [Free Template]](https://homeschool.imarkdev.com/wp-content/uploads/2022/05/fathers-day-craft.jpg)
12 Comments